Drawing Aura With Paint.net

Revision Date: 14 April 2021

Line/Curve ToolLine Curve Tool
O once

This tool is used to draw lines and curves. These two abilities are grouped into a single tool because a line is really a perfectly direct curve. In other words, this tool always draws curves, where a direct line is a subset involving no bodily curvature.

Drawing a line is straightforward: click where the line begins and elevate the mouse pointer to the terminate point. Releasing the mouse button ends the "drawing" phase.

Annotation

Using the Left Mouse button renders the line with the Primary color.  Using the Right Mouse Push renders the line in the Secondary colour.

When the drawing stage is ended, four command nubs appear on the line and the 4-style move icon appears merely off the end point of the line.
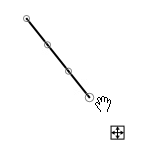
Handles
Line/Curve Handles

The Control Nubs and Move icon pulsate to make them easier to distinguish.

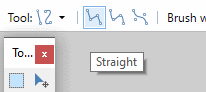
If a single, straight line is desired, press the Enter key or click the End button in the Tool Bar to commit the line to the canvass.  Drawing elsewhere on the canvas finishes any previous line and starts a new ane.

Tip

Holding down the Shift key earlier releasing the mouse push constrains the line to angles that are multiples of fifteen degrees, due east.g. 0°, fifteen°, 30°, 45° sixty° and and then on.

If a curve is desired, drag the control nubs to a new location by clicking and dragging.

Moving a Line/Curve

Earlier a Line/Bend is committed to the sheet, information technology can be moved anywhere on the canvas. Click and drag the pulsing four-arrows-in-a-square icon (see diagram below) using the Left Mouse Push to reposition the Line/Curve.

The keyboard pointer keys tin besides exist used to move a Line/Curve.  A unmarried key press moves the object by one pixel in the direction of the arrow. Simultaneously holding the Ctrl cardinal moves the object by 10 pixels per pointer key printing.

Rotating a Line/Curve

Before a Line/Curve is committed to the canvass, it can exist rotated about its geometric center.

Rotate the Line/Curve about the center using the Right Mouse Push button. Click and elevate to rotate.  As a visual guide that rotation is possible, the mouse pointer will plow into a double headed arrow (run into diagram).

Rotate or Move a Line/Curve
Rotate Cursor

If the Shift fundamental is held down while rotating the angle of rotation is snapped to xv degree increments.

The keyboard arrow keys tin can likewise be used to rotate a Line/Curve while the Right Mouse Button is held downward.

Committing a Line/Curve to the sail

Commit a Line/Curve to the active layer and exit editing mode using any one of these methods…

  1. Printing the Enter key
  2. Click outside of the bounding box of the current Line/Curve.
  3. Click Finish in the Tool Bar
  4. Draw a new Line/Bend.

Bend TypesSpline ModeBezier Mode

There are two icons in the Tool Bar for changing between Cubic Spline and Bézier curves.  These supercede the Correct click & drag that pigment.net iii.5x used.

Curve Types
Bend Types

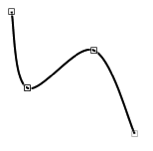
If the Left icon (Spline) is selected, the line will be curved using cubic spline interpolation.  Information technology volition ever continue through each of the Command Nubs, fifty-fifty if the nubs are relocated or dragged off canvas.  When a nub is moved, the curve will exist redrawn so that it e'er goes through the centre of each Command Nub.

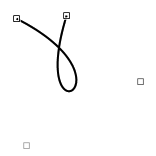
If the Correct icon is selected (Bézier), a Bézier curve results.  With this curve type, the bend will extend from the first or origin Control Nub to the final or destination Command Nub.  The 2d and 3rd Control Nubs modify the curve along its path. The curve will not necessarily touch either the 2nd or third Control Nub.  Some types of Bézier curves cannot be drawn using the Cubic Spline blazon.

Cubic Spline
Cubic Spline
Bezier Curve
Bézier Bend

Tip

Switch between curve types by toggling between the two Bend Icons in the Tool Bar.  The curve volition be reinterpreted based on the bend blazon and current location of the Control Nubs.

Brush Width, Line Way and Make full

Lines and curves are subject to the Brush settings in the Tool Bar. Brush Width, Line Styles & Fill Blazon are all configurable.

Line/Curve Options
Line/Bend Options

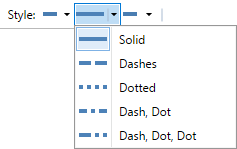
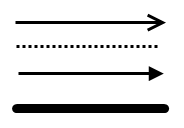
The Line/Bend can accept different start cap, dash fashion, and cease cap. The start- and terminate-caps can be flat (normal), one of two arrow head types, or rounded. The dash fashion can exist either solid or a combination of dashes and dots.

Line Styles
Line Styles

Using Brush Width & Line Styles lines like these can exist drawn:

Line/Curve Example
Case Lines

Lines and curves can be rendered using a Make full Type every bit specified in the Tool Bar.  This feature allows the line/bend to exist filled with one of numerous patterns rather than a solid color.

Fill Styles
Make full Styles

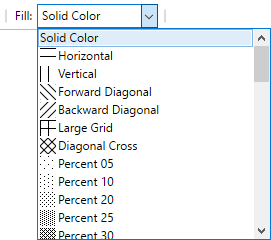
Fills utilizing a fill mode will brand use of both the Chief and Secondary colors.

Antialiasing

There are two antialiasing modes associated with the Line/Curve tool.

Antialiasing Modes
Antialiasing Modes

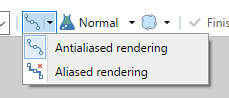
These settings determine whether the line is rendered in a clip-to-pixel mode or not.
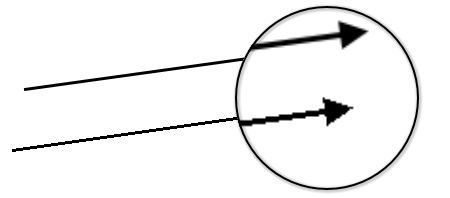
The effect of antialiasing on lines

When Antialiasing is enabled, lines will appear slightly thicker and smoother (upper example).

When Antialiasing is disabled, lines are rendered in solid pixels and appear more jagged and thinner (lower example).

Antialiasing can be switched on or off via the
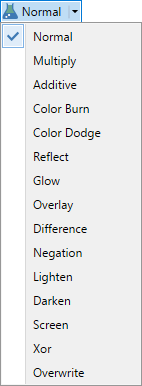
 Tool Bar when the Text tool is active.

Blend ModesBlend Modes

Lines and curves tin can exist applied using a Alloy Mode selected from the Tool Bar.  The line/curve will be applied in accordance with the other parameters and so reinterpreted as if the pixels were on their own layer with the layer blend mode set.

Tool Bar Blend modes
Tool Bar Blend Modes

skempabitte.blogspot.com

Source: https://www.getpaint.net/doc/latest/LineCurveTool.html

0 Response to "Drawing Aura With Paint.net"

Post a Comment

Iklan Atas Artikel

Iklan Tengah Artikel 1

Iklan Tengah Artikel 2

Iklan Bawah Artikel